[Wiring Help Needed] How to wire 2 LED strips to 1 Arduino Nano with I/O switch?
115 Replies
Unknown UserOP•9mo ago
Message Not Public
Sign In & Join Server To View
Deciding if you want to device the led strip is more to do with wiring than "seperating the patterns"
Unknown UserOP•9mo ago
Message Not Public
Sign In & Join Server To View
you can test the project in wowi
ColorPalette.ino - Wokwi ESP32, STM32, Arduino Simulator
Run IoT and embedded projects in your browser: ESP32, STM32, Arduino, Pi Pico, and more. No installation required!
Unknown UserOP•9mo ago
Message Not Public
Sign In & Join Server To View
you jave a strip.
you can either wire it as two or logically make it two
Unknown UserOP•9mo ago
Message Not Public
Sign In & Join Server To View
Ok. What I am saying is, you can have one strip, which acts as two LOGICAL strips.
If you want two physical strips then you can do that as well.
All depends on wiring ease
So you have a power bank.
Unknown UserOP•9mo ago
Message Not Public
Sign In & Join Server To View
ok.
@NikkeiZX

Fast Led 2 bars - Wokwi ESP32, STM32, Arduino Simulator
Run IoT and embedded projects in your browser: ESP32, STM32, Arduino, Pi Pico, and more. No installation required!
Unknown UserOP•9mo ago
Message Not Public
Sign In & Join Server To View
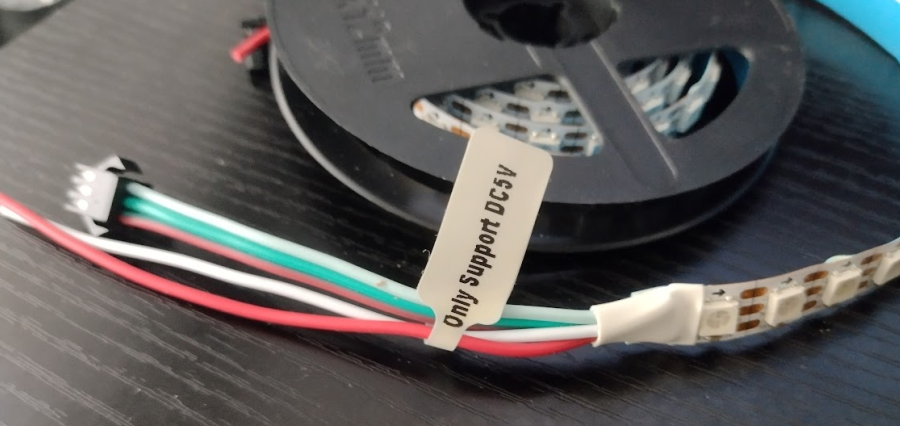
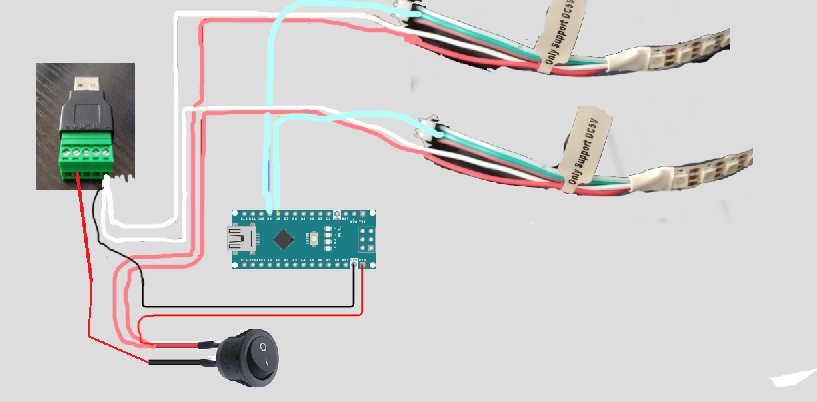
the red and white thicker wires are to supply power from an external source. if powering that way (which is recommended) you only connect ground and data to the arduino
Unknown UserOP•9mo ago
Message Not Public
Sign In & Join Server To View
the red on the connector would go to the arduino 5v, yes
USB 5-pin terminal ? oh, that green phoenix terminal, yes, 5v power to the strip from there, three pins back to arduino
inside that heatshrink tubing red & white are connected to the thinner red & white
that way no high current passes through the arduino
which was the long way of saying yes you are correct 😉
@NikkeiZX also check the orientation of the usb connecter wiring - I dont know which pin is what in terms of 5v and ground
Unknown UserOP•9mo ago
Message Not Public
Sign In & Join Server To View
so the greens are the signal wire to the leds.
The white is ground - so thats wrong hang on
the blue and yellow are actually green 😆 but for claritys sake...
Unknown UserOP•9mo ago
Message Not Public
Sign In & Join Server To View
on the leds, those wires connect to the same place on the strip as the white and the red on the connector
Now with 100 50 leds on each strip, you have to consider the current
each led "pixel" consists of 3 leds which at full brightness would take about 20mA each so one pixel is 60mA
Unknown UserOP•9mo ago
Message Not Public
Sign In & Join Server To View
so 50 x 60mA at full brightness white = 3 Amps
so you have to work out the overall brightness to have the effect you want while keeping the current draw down
do you have a video of the effect yoy want ?
Unknown UserOP•9mo ago
Message Not Public
Sign In & Join Server To View

Fast Led 2 bars - Wokwi ESP32, STM32, Arduino Simulator
Run IoT and embedded projects in your browser: ESP32, STM32, Arduino, Pi Pico, and more. No installation required!
this is where wokwi can save some time by testing there
Now with wokwi, you dont need to place the 5v and ground - that is already assumed. so dont be confused by the lack of wires
Unknown UserOP•9mo ago
Message Not Public
Sign In & Join Server To View
Yes, you can change that -
I have updated it so you can just change the type
https://wokwi.com/projects/427655993133052929
Fast Led 2 bars - Wokwi ESP32, STM32, Arduino Simulator
Run IoT and embedded projects in your browser: ESP32, STM32, Arduino, Pi Pico, and more. No installation required!
and added in the fade to black for reference
The fast led library has a lot of examples.
Unknown UserOP•9mo ago
Message Not Public
Sign In & Join Server To View
@NikkeiZX you can add in the pulse.
@NikkeiZX how did you go ?
https://wokwi.com/projects/427655993133052929
if this helps
Fast Led 2 bars - Wokwi ESP32, STM32, Arduino Simulator
Run IoT and embedded projects in your browser: ESP32, STM32, Arduino, Pi Pico, and more. No installation required!

oh
this allow you to make the thing longer or differrent colors

Unknown UserOP•9mo ago
Message Not Public
Sign In & Join Server To View
GitHub
FastLED HSV Colors
The FastLED library for colored LED animation on Arduino. Please direct questions/requests for help to the FastLED Reddit community: http://fastled.io/r We'd like to use github "...
Unknown UserOP•9mo ago
Message Not Public
Sign In & Join Server To View
@NikkeiZX
GitHub
Pixel reference
The FastLED library for colored LED animation on Arduino. Please direct questions/requests for help to the FastLED Reddit community: http://fastled.io/r We'd like to use github "...
so you can use CRGB( 0, 255, 127);
anywhere where CRGB:: is used you can use like CRGB( 0, 255, 127) to define your colours exactly
or you can make you own colour sets
eg
with some fiddling 8-)
@NikkeiZX this is the last one with defined colours
https://wokwi.com/projects/427655993133052929
Fast Led 2 bars - Wokwi ESP32, STM32, Arduino Simulator
Run IoT and embedded projects in your browser: ESP32, STM32, Arduino, Pi Pico, and more. No installation required!
Unknown UserOP•9mo ago
Message Not Public
Sign In & Join Server To View
SORT OF.
delay is a blocking function - it stops everything from working
Unknown UserOP•9mo ago
Message Not Public
Sign In & Join Server To View
hmm ?
Unknown UserOP•9mo ago
Message Not Public
Sign In & Join Server To View
y starts at 0 and move along to < number of leds
So you would start from NUM_LEDS -1 and go to y <0 and y-- to reduce
or
change
leds[y] = mycyan ;
to
leds[NUM_LEDS - y] = mycyan
And some other work on the red yellow pard...
Unknown UserOP•9mo ago
Message Not Public
Sign In & Join Server To View
I am looking at reversing the whole code. for the wiring.
Will have to get back to you on this - work calls. 😱
@NikkeiZX oh, after your comment I checked - the apparent wring in wokwi is not true to life. The first led lighting is next to the din wire.

The middle line is seprate neopixels - so on the actual animation the leds start where the wire is...
Unknown UserOP•9mo ago
Message Not Public
Sign In & Join Server To View
Yeah, but test it
@NikkeiZX how did you go ?
Unknown UserOP•8mo ago
Message Not Public
Sign In & Join Server To View
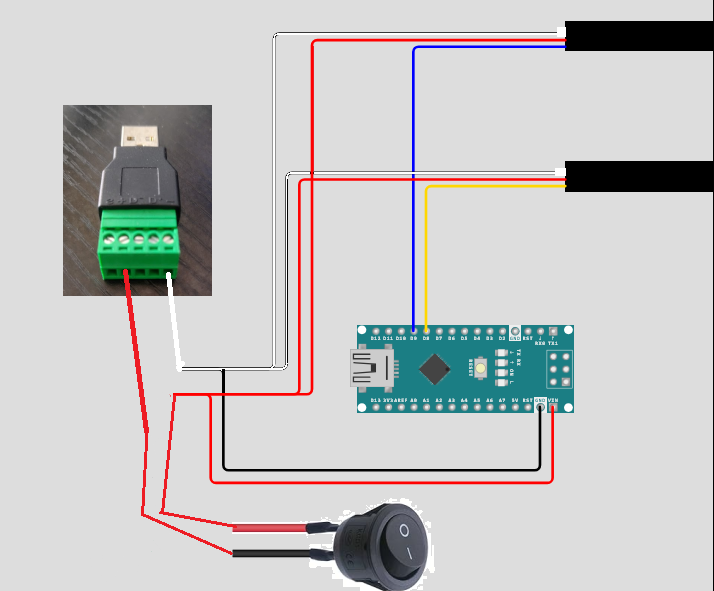
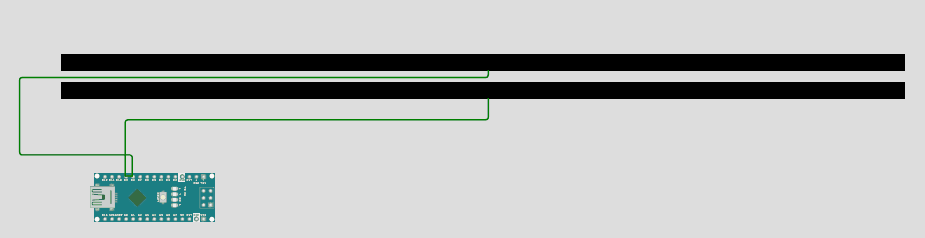
this diagrame ?

@NikkeiZX you have two of these ?
@NikkeiZX
clearer ???
Unknown UserOP•8mo ago
Message Not Public
Sign In & Join Server To View
Make sure the white/black in in grn -
Red in power + on usb connector
Unknown UserOP•8mo ago
Message Not Public
Sign In & Join Server To View
the vin on the nano 3 is a voltage regulated input
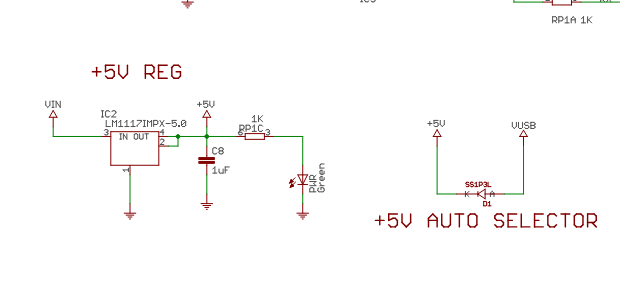
It auto selects the power source if the usb us plugged in. you should not need to unplug anything
Unknown UserOP•8mo ago
Message Not Public
Sign In & Join Server To View
Led_sword_cyan - Wokwi ESP32, STM32, Arduino Simulator
Run IoT and embedded projects in your browser: ESP32, STM32, Arduino, Pi Pico, and more. No installation required!
I have to recreate the other animation
as well
@NikkeiZX mostly done
Unknown UserOP•8mo ago
Message Not Public
Sign In & Join Server To View
this is the block that moves down the sword
cyan cyan cyan yellow yellow yellow white white white yellow yellow yellow
I am trying to fix some glitchy stuff with that
the cyan is a fiddle to keep the sword coloured but is stupid
@NikkeiZX
in the video - it looks like the centre of the moving block is a bit red. Is that a camera artefact
Unknown UserOP•8mo ago
Message Not Public
Sign In & Join Server To View
It can be added if you want.
but the actual moving block looks kinda red
Unknown UserOP•8mo ago
Message Not Public
Sign In & Join Server To View
Naw - I like pink....\
Unknown UserOP•8mo ago
Message Not Public
Sign In & Join Server To View
Led_sword_cyan - Wokwi ESP32, STM32, Arduino Simulator
Run IoT and embedded projects in your browser: ESP32, STM32, Arduino, Pi Pico, and more. No installation required!
try that - colour order was wrong
Unknown UserOP•8mo ago
Message Not Public
Sign In & Join Server To View
though, instead of the waves flowing continuously, is there a way to have it where it only sends 1 wave every 3 seconds?
so.
sequence
turn on.
run start up - cyan to top
then run first yellow animation ?
wait 3 seconds
run next wAve
Unknown UserOP•8mo ago
Message Not Public
Sign In & Join Server To View
are you happy witht he size of the clock ?
block
and colours @NikkeiZX
Unknown UserOP•8mo ago
Message Not Public
Sign In & Join Server To View
carefully ?
😆
Unknown UserOP•8mo ago
Message Not Public
Sign In & Join Server To View
I will add this in
then
then you set up
so in that case -
the block size is 5 (starting at 0 ) = 5
the size of the block array is 5 (starting at 0 ) = 5
and the colours are as setup
You can increase or decrease as required
youc an also define your own colours as per mycyan
I changed the block name to make more sense.
Unknown UserOP•8mo ago
Message Not Public
Sign In & Join Server To View
Led_sword_cyan 2 - Wokwi ESP32, STM32, Arduino Simulator
Run IoT and embedded projects in your browser: ESP32, STM32, Arduino, Pi Pico, and more. No installation required!
on real hardware is better speed
Unknown UserOP•8mo ago
Message Not Public
Sign In & Join Server To View
Starts serial for debugging. Can be removed
You can print on the serial monitor to see what the variables are doing or where the program is at.
eg
Serial.println("Ended Setup");
Thats bout the speed on real hardware with the settings above
Unknown UserOP•8mo ago
Message Not Public
Sign In & Join Server To View
Yes, but wear sunglasses.
Unknown UserOP•8mo ago
Message Not Public
Sign In & Join Server To View
Yeah, check once it is in cover.
The other option in power saving is to rapidly turn them off and on, but that is painful.
You can roughly work out the use by 20mA x each intensity value in colours.
Eg your cyan
0 x 20
20 x 255/255
20x 255/127
So 30mA at full brightness
Per pixel
Then divide by brightness.
Eg half bright = 15mA per pixel of cyan
This is roughly a guide.
Unknown UserOP•8mo ago
Message Not Public
Sign In & Join Server To View
No access - set to public ?
@NikkeiZX
what is the issue ?
Unknown UserOP•8mo ago
Message Not Public
Sign In & Join Server To View
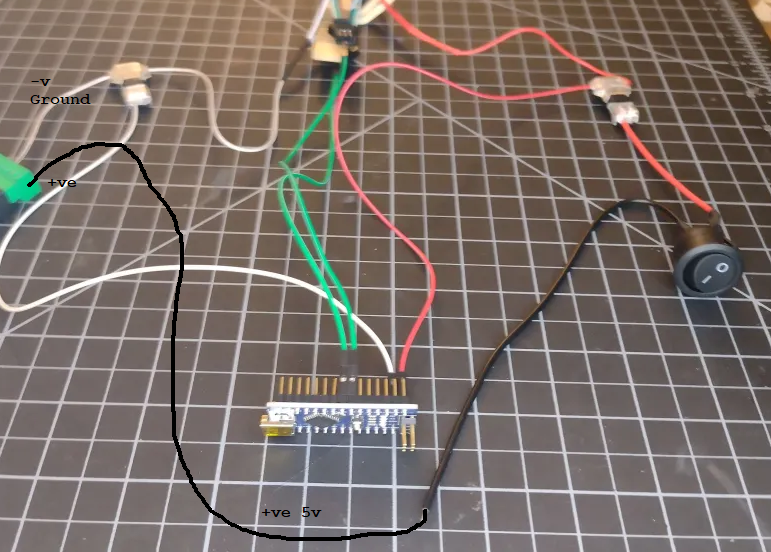
the colour of the cables is not important on the switch
they slap red and black on it just --- because.
Unknown UserOP•8mo ago
Message Not Public
Sign In & Join Server To View
I HATE that !
Just realised my print is 50x50 and its meant to be 75x75...
Unknown UserOP•8mo ago
Message Not Public
Sign In & Join Server To View
looks fine - you have the two control lines to the leds strips. Earth and 5v
Once the black wire goes to the +ve of the usb thingy
You can put a label on the black sucker...... +VE
Turn it on and then adjust the timing
Unknown UserOP•8mo ago
Message Not Public
Sign In & Join Server To View
Nice work. One thing you could do is work out the values for a less bright cyan, then have the power block moving down the blade as a higher brightness
Thanks for sharing as well
@NikkeiZX
@NikkeiZX please note
The FastLED Hue-Saturation-Value color model differs from 'traditional' computer HSV color models in two important respects:
first is differences in the numeric range of values used to represent colors (everything here is a one-byte value from 0-255),
and second is in the mapping of hue numbers to colors themselves (FastLED defaults to using a richer 'rainbow' color map, instead of the traditional 'spectrum' color mapping).
What it means is we can set the values for each section rather than the WHOLE strip
so you can have cyan 20% brightness
then the power pulse 50%
Unknown UserOP•8mo ago
Message Not Public
Sign In & Join Server To View
The code is the same result as previous, only change is not using the overall brightness control
If you have received g b color pref, you can convert to have using rgb2hsv_approximate