Why does my stepper motor driver heat up to 90+°C?
I am building a rubic's cube algorithm teacher robot. For the rotational movement, I use Nema 17 stepper motors (17HE15-1504S) with DRV8825 drivers. These drivers tend to heat up to 90+°C, even with proper voltage reference set up. I am looking for help to find out if I messed up something with the wiring/ used mismatching parts or if I should just upgrade the heat sinks. I asked my original questin in #hardware-help but there were way too many replies, so I decided to tidy it up here in one place.
Original question: https://discord.com/channels/420594746990526466/863150139206926347/1384146923132551369
26 Replies
ORIGINAL
Hello everybody. I'm new here and I wanted to make sure I am asking my question in the right channel, so please guide me to do the right direction if this is not the right place for my message.
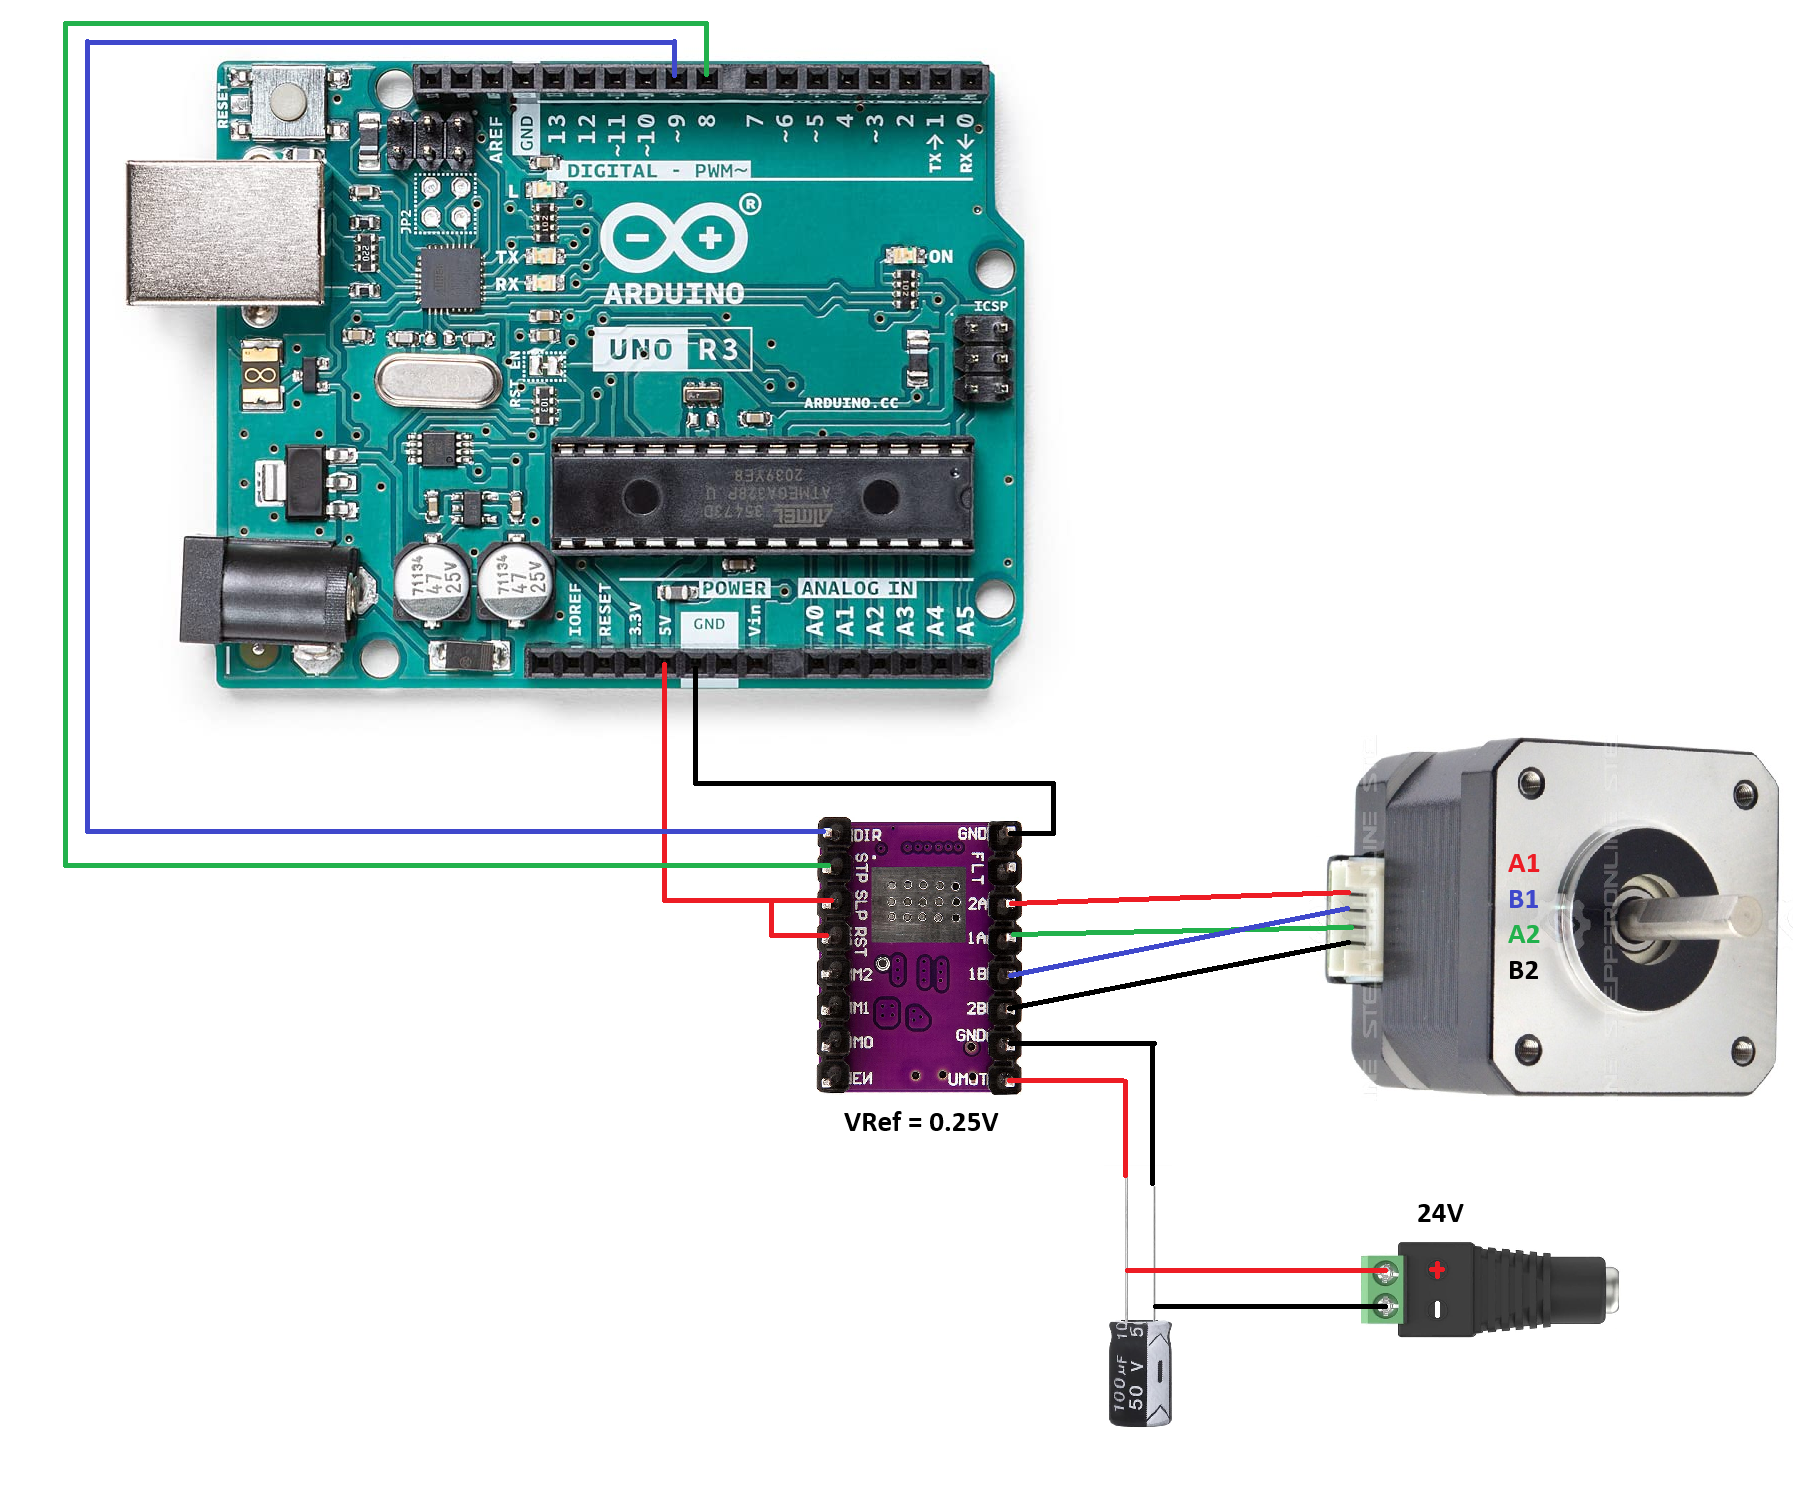
I am newby when it comes to electronics and arduino, but I work as a web dev for 2 years now, so I have some programming knowledge. I started working on a rubics cube algorithm teacher robot, for which I first used the cheap 28BYJ-48 stepper motor with the corresponding ULN2003 driver. It turned out to be too weak for turning the faces of a rubics cube. I first experimented with designing gears for it, but it was unreliable so I decided to go for a more expensive stepper motor and driver. My choices were a 5 pack of Nema 17 motors from StepperOnline (P/N: 17HE15-1504S) and a 5 pack of DRV8825 drivers. Since I am not planning to run all the motors at the same time, I bought a 24V 6A power supply. I did my research (as good as I could) and found out that the motors are rated for 1.5 Amps, so I adjusted the drivers to have 0.75 VRef (given the formula Vref = rated current / 2). I have sticked the heatsinks to the IC, but nevertheless the temperature started to raise quickly (I touched it with my fingers and it was unbearably hot). Because of this reason, I adjusted the Vref (with the motor being disconnected) to just 0.25 V, to experiment with it without accidentally frying the IC. This seemed to solve my problem when I had my motor in a stationary position, but as soon as I uploaded a simple endless rotational script to the arduino, the heatsinks started to heat up again, though this time, not that much, so I decided to measure the heat with my multimeter. While th motor was running the heat was crawling up continously with a steady phase, and it reached around 80°C in around 20 seconds of running. This was the point when I turned off the device, because I have read it in the datasheet of the driver, that it can only handle 80°C safely.
Can anybody help me please, to find out what I have done wrong, or how I could fix my heat sink and IC getting hot, or if it is normal for drivers to get this hot under load? I gladly provide images and more information if it is necessary, I just ran out of characters in my previous message and I don't want to include too much information about the nonrelated stuff (and being a beginner it's hard to decide what is relevant 😄 ). Thanks in advance for anyone who is willing to help 😄
Fragler — 02:47
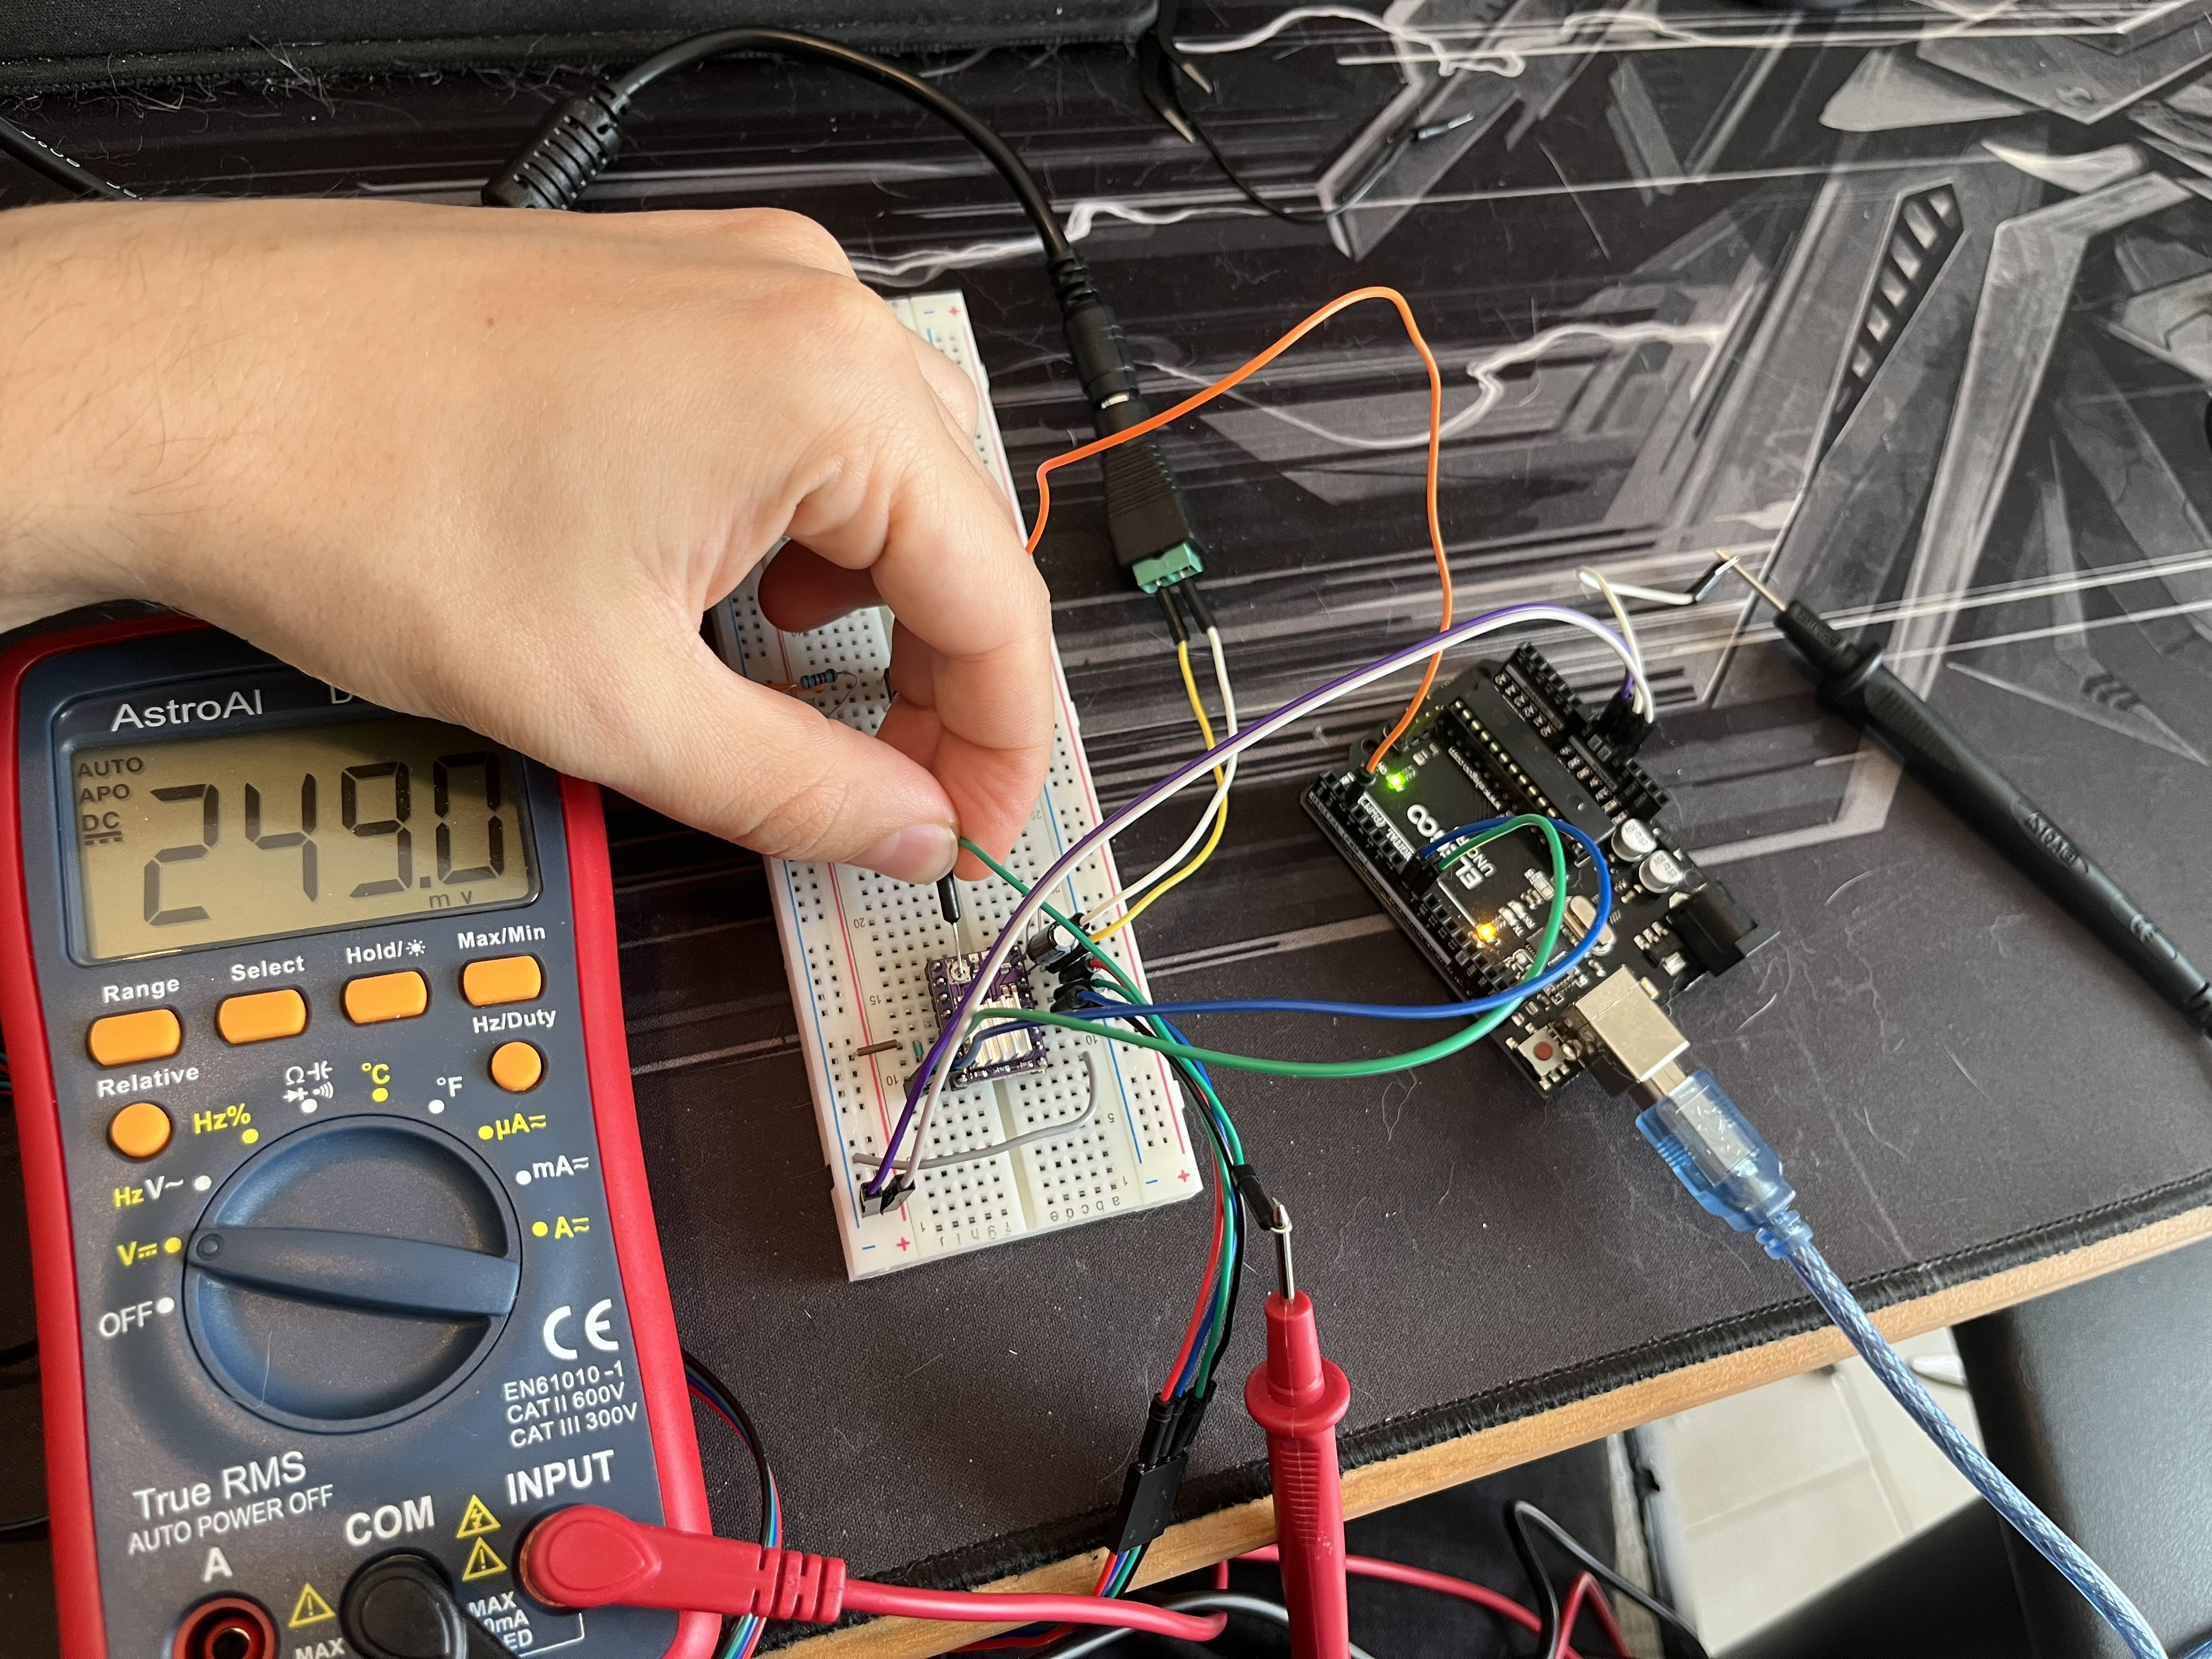
@Toph @robherc KV5ROB KV5ROB @DarwinWasWrong I made this short video. Vref is set to ~250 mV (as visible on the photo). The video is sped up 5x. It took around 5 minutes to reach 50°C. Then I tested it with 0.5V Vref, and the temperature went up to 95°C and it stayed there
https://cdn.discordapp.com/attachments/863150139206926347/1384220371552702616/Arduino_1.mp4?ex=6851a32e&is=685051ae&hm=d5ae00e1a9b3a58de749b633c98313efcde86e96024fbb60c512941c958535b0&
Maderdash — 06:56
@Fragler you need to plan share your project planning pdf/page.
Toph — 15:49
as already mentioned, seeing your clearly drawn wiring diagram (depicting exactly how you connected everything together) would be prudent so we can identify potential problem sources...
🤓 needless to say, measuring voltages & currents flowing through your circuit would also provide a clue as to what could be happening...
Fragler — 20:01
@Toph If you guide me through on what to measure, I gladly make measurements 😊
@KLevi — 21:32
What did you use for the thermal compund?
Fragler — 22:36
Unfortunately the basic 2 sided 3M tape that the manufacturer provided with the heat sinks.
KLevi — 22:50
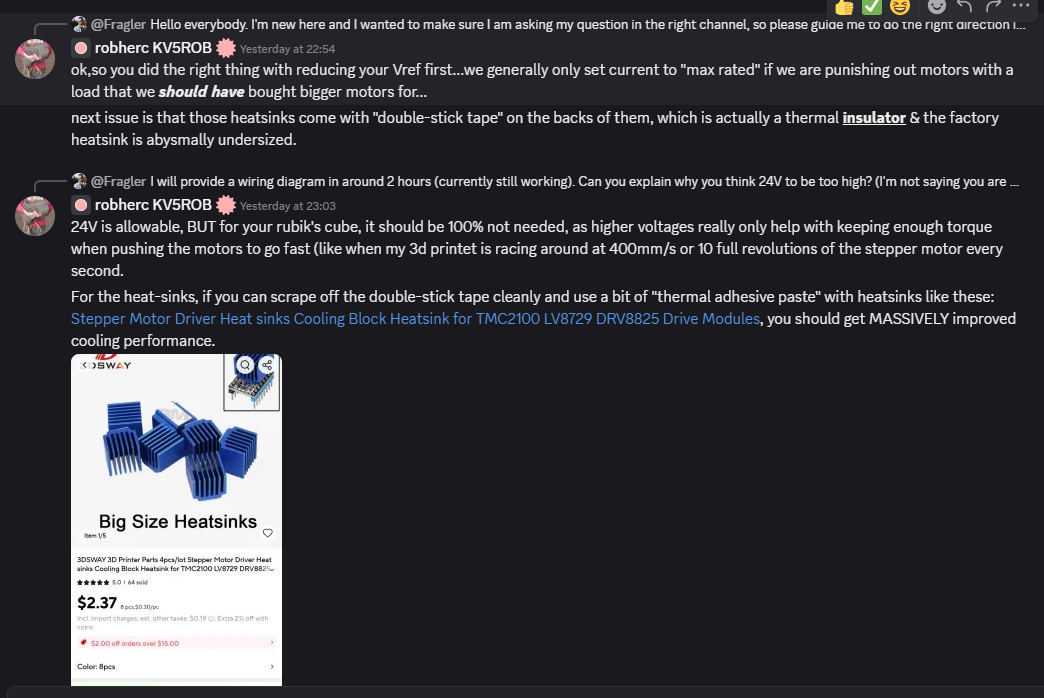
Take that off. Thats worse than nothing. Thats insulating material...
Fragler — 22:55
Do you think so? 🤔 I mean, on the video it's visible that the heat sinks warm up to 50°C anyways.
KLevi — 23:18
I mean... beacause the chip is cooking under there and the heat sink is not warming up because it has an insulator below it
So if you use proper thermal paste it will warm up more
Fragler — 23:19
Do you think that the heat sinks would be even warmer if the double sided tape wouldn't insulate them?
All right, I'll order some thermal adhesives and some proper heatsinks 😄 This project is getting slightly more expensive with every day 😂
KLevi — 0:44
Definitely
You can use computer paste which you can get for 1-2$. Or thermal "plaster" works okay as well
Maderdash — tegnap 23:26-kor
@Fragler you need to plan share your project planning pdf/page.
Fragler — tegnap 23:32-kor
I am sorry @Maderdash, but I don't have any planning pdf or page. I have just started learning electronics and arduino a few weeks ago, totally on my own, and decided to learn by doing, thus I did not exactly know, what to plan for 😄 Eg. I bought very cheap stepper motors (28BYJ-48) that couldn't even turn the faces of the cube, so I had to change them for more expensive Nema 17 motors. I think figuring out these things is part of the learning process. I have a vague idea of what I want to do, and I buy parts as I go forward 😄 I already finished my LCD screen setup with a proper menu, and now I'm working on setting up the motors 🙂
Maderdash — tegnap 23:55-kor
Thats fine..
And its a valid way of learning..
however, all of your findings you should document some how. A pen and paper note book or an app. Or a pdf. Or even a video blog. What ever you like. But document your findings and your progress on the projects you do.
Trust me it pays dividends later.
Fragler — 0:11
I actually started noting every difficulty I found and how I solved it, and what I learned in the process into a regular old txt file 😄 . While I was doing that, I thought of producing a video of it when I finish the project 🙂
stepper with A4988 - Wokwi ESP32, STM32, Arduino Simulator
Run IoT and embedded projects in your browser: ESP32, STM32, Arduino, Pi Pico, and more. No installation required!
this is awesome, thank you 🙂
ok, finally back home & done with that 20hr marathon workday... do we have a current "status update" @Fragler ?
is it just me, or isn't the EN pin left floating in this diagram?
iirc EN is held LOW internally, set it HIGH to disable
With the current heatsinks and underpowering the drivers (Vref set to 0.25V), I measured 50-60°C. Raising the Vref to 0.5, and spinning the motor continuously with AccelStepper library, it crawled up to 90-100°C. So as you recommended, I ordered some better heatsinks and thermal-adhesive from aliexpress
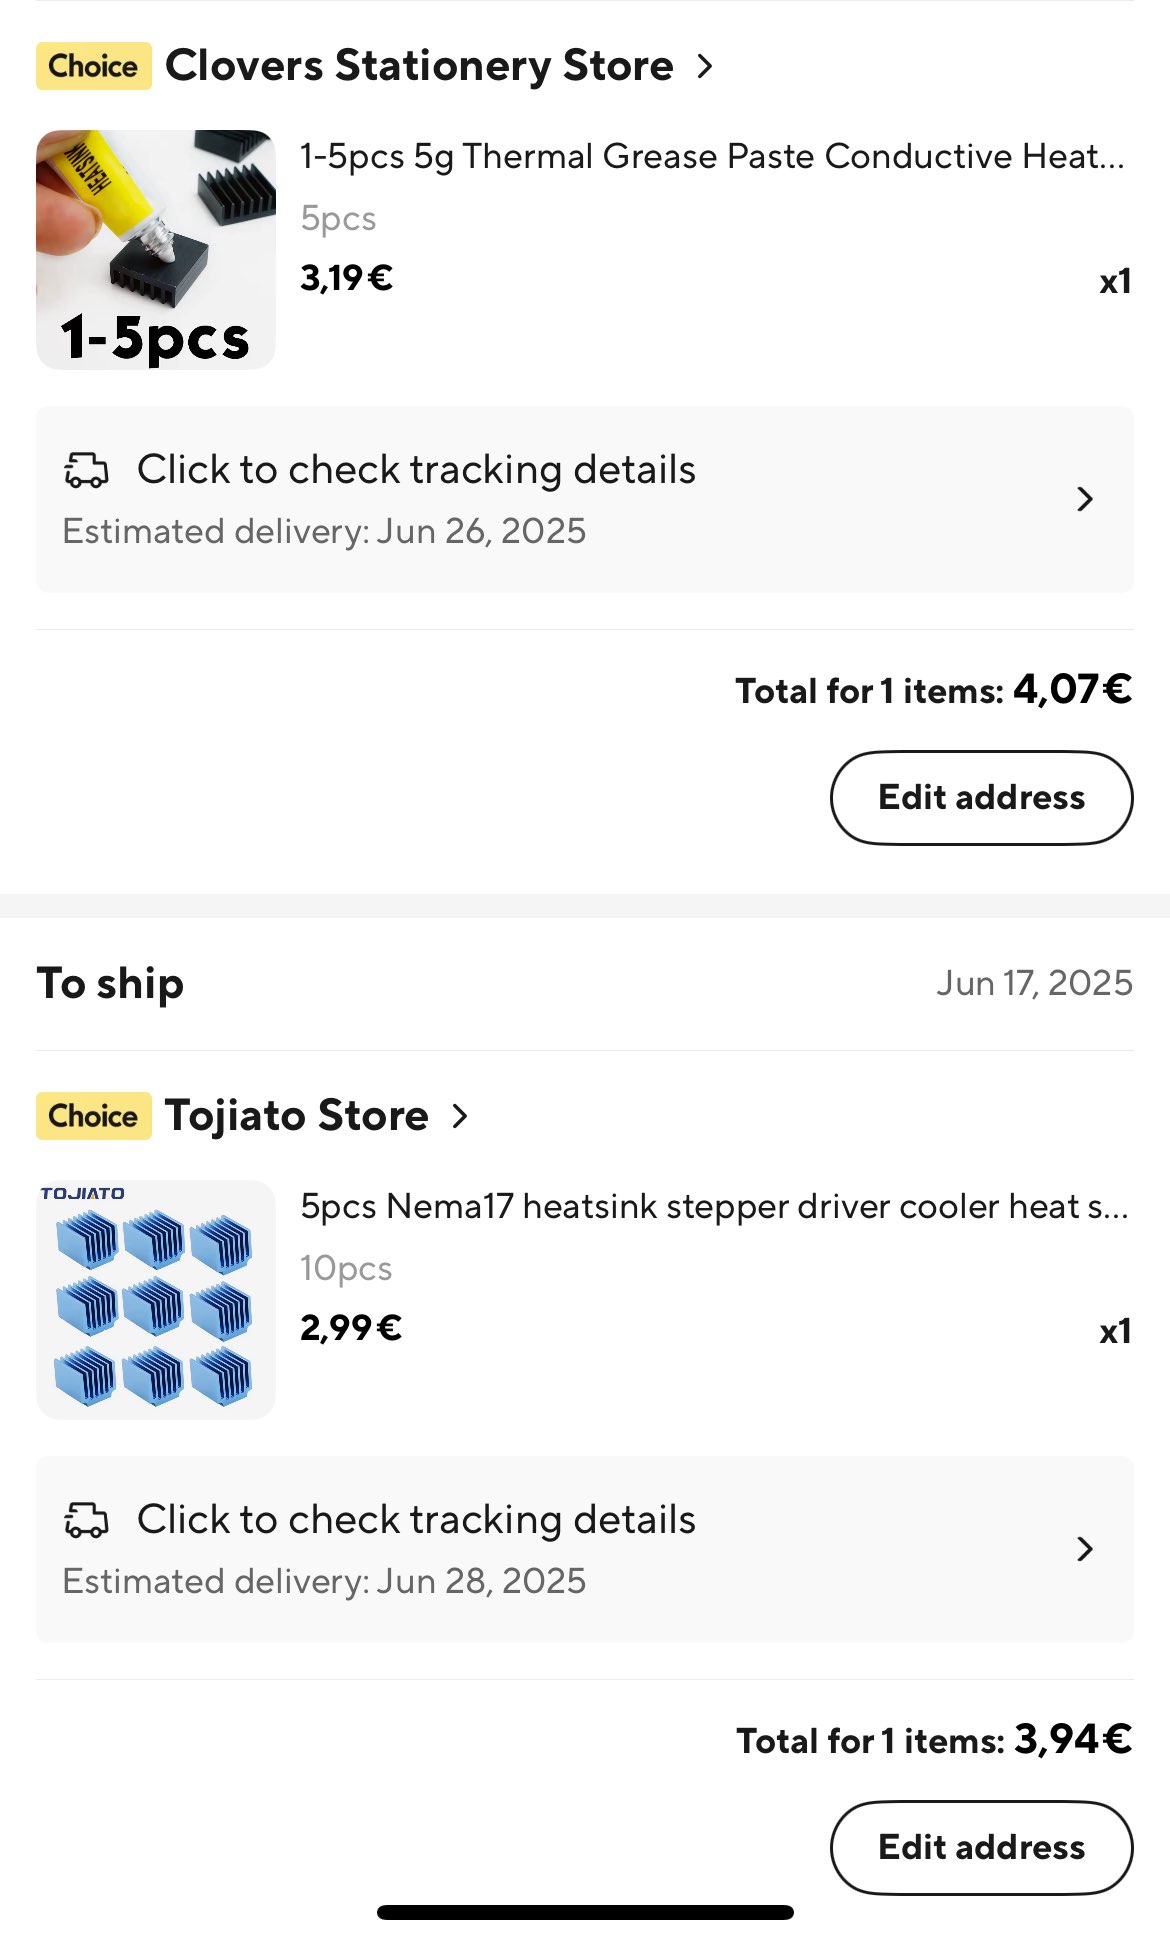
These ones to be exact. While I am waiting for then to arrive, I 3D printed some clamping “claws” to experiment with. There are a lot of issues regarding that 😄 either they are too bulky and hinder the other claws from turning the sides, or they are too slim, and instead of turning the whole face, they just turn the middle cubelets instead 🫠
I also struggle with designing a proper frame. At first I wanted it to be slim and slick, but now I recognized that I’ll have to move the motors further from eachother to let the cube go, and closer to eachother to grab the cube, witch either needs 4 extra motors, or one with some mechanics, or a complete mechanical system 😄
of curiosity, how do you plan to rotate the "middle sections" of the rubicks cube with your motors?
I don’t know if you know the rubic’s cube notations, but if you think of M, S and E turns, then nohow 😄
An M turn, for example, is identical to an L’, R turn followed by a cube rotation (x’). Since the middle parts are going to be stationary in my solution, I account for a cube rotation by converting the algs into compatible ways. Eg: if originally an M was followed by a U turn, I convert it to L’, R, B.
I hope I could explain it clearly enough 😅 but if not, or if you don’t know the notations, let me know, and I will create a short explanation video 😁
Ps: English is not my native language, so sorry for mistakes 😅
We forgive all.
yeah, sorry but I think the last time I actually physically touched a rubicks cube, was at least 15 years ago 😆
Okay so would you like me to make a short vid explaining visually what I wrote previously? 😁
it's up to you whether or not you feel like it.
https://youtu.be/w3f-WyDqOUw considered this method where they rotate the cube in holder ?
Hans Andersson
YouTube
Tilted Twister 2.0 - LEGO Mindstorms Rubik's Cube solver
See http://tiltedtwister.com for info and building instructions
Features:
Solves a standard Rubik's cube
Can be built from a single LEGO Mindstorms NXT 2.0 set
Completely stand-alone. No need to connect a computer
No web cam needed. It detects the colors using the LEGO Mindstorms color sensor
Support for Herbert Kociemba's Two-Phase Algori...
I have sern this meghod but I don’t really like it. It takes too much rotations to turn the cube into the proper position to then just turn one side once. I prefer having one motor per side ☺️
Yeey, the heatsinks finally arrived. I’m not sure how much time will I have this weekend and next week, but I’m gonna test these out as soon as I can 😄
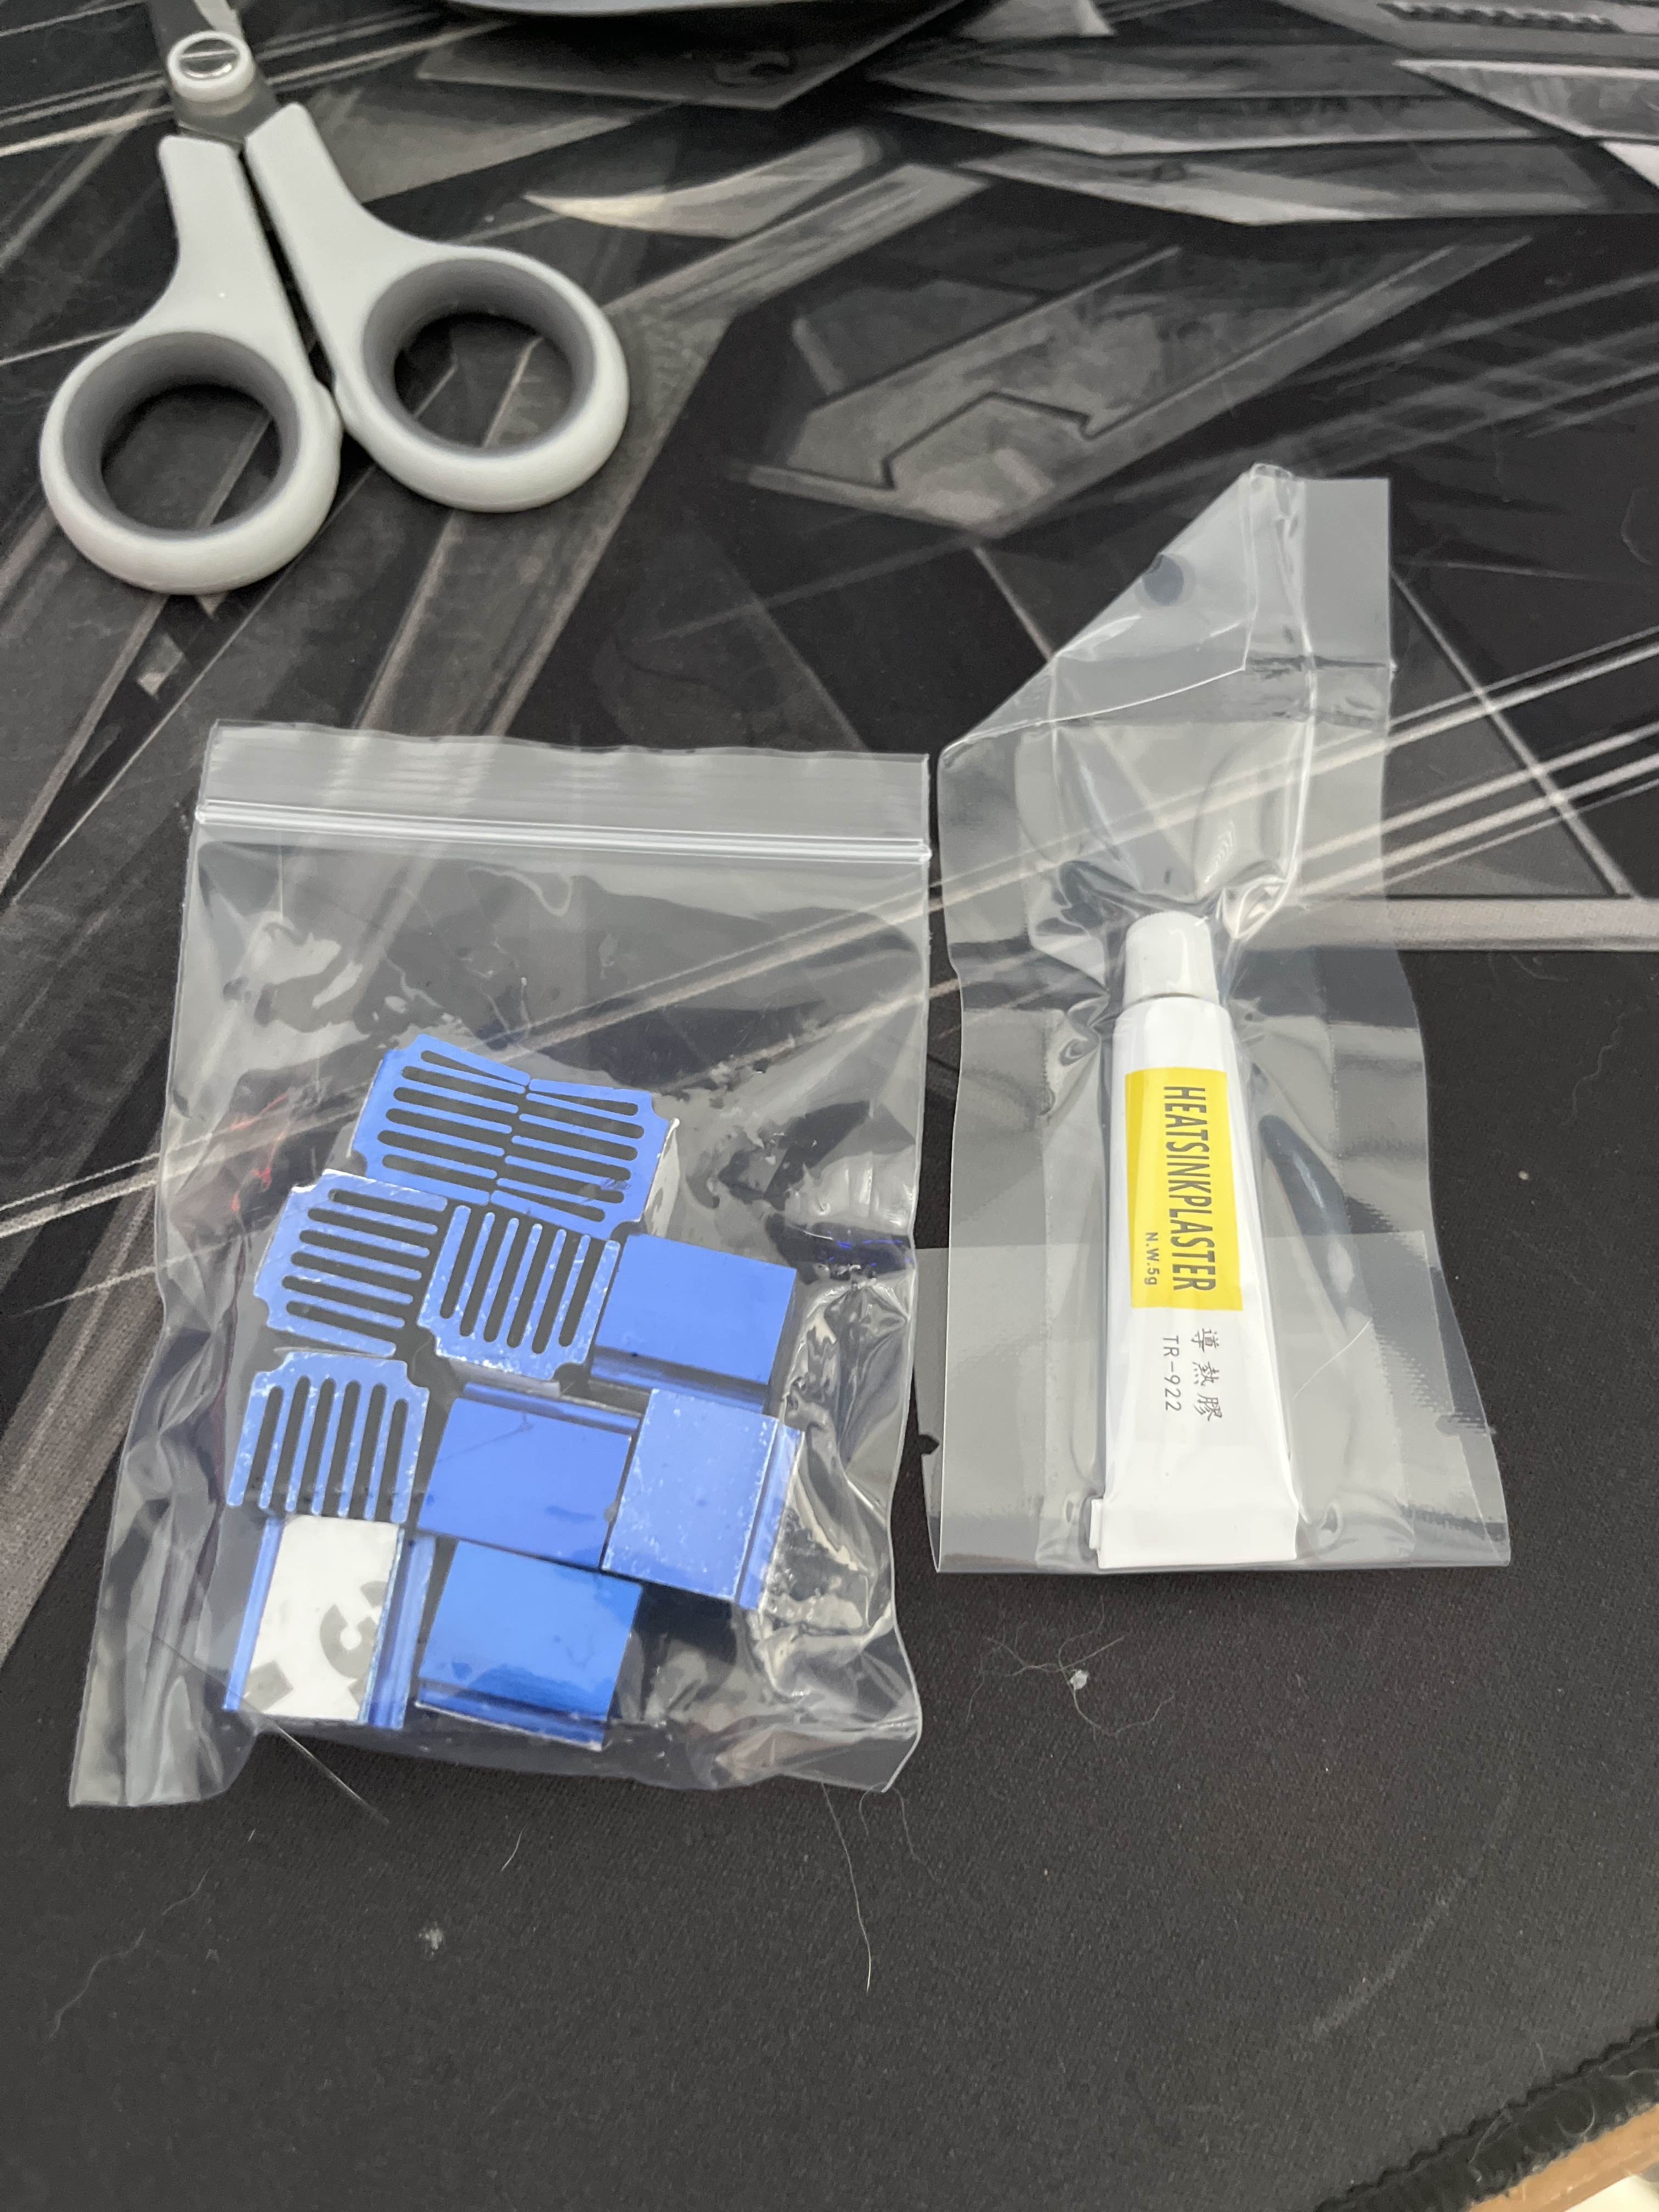
If you have double sided tape on them, alcohol (or paint thinner / brake cleaner) can be used to get it off
fancy schmancy...I just scraped mine off, lmao
Yeah, gonna do. That’s why I ordered the thermo paste adhesive too 😉