25 Replies
That's great to hear! We have detailed build guides for both our Corne and Lily58 keyboards, which include step-by-step instructions and embedded video tutorials for each stage of the assembly process.
You can find them here:
docs.typeractive.xyz/build-guides
Just select your keyboard model (Corne Wireless or Lily58 Wireless) to get started.
Let me know if you have any questions during your build!
Thanks m8
You're welcome! Feel free to reach out if you have any more questions as you assemble your keyboard. I'm here to help!
Do you need a header to flash for the keyboard to be operational
To flash the nice!nano itself, you just plug it into your computer via USB. No additional headers are needed for just the flashing process.
However, for the keyboard to be operational, the nice!nano must be installed onto the PCB. This installation does require headers or hotswap sockets to make the electrical connection. We offer several methods for this, including EZ-Solder Hotswap, No-Solder Hotswap, and Mill-Max Hotswap, all of which use some form of header or socket.
You can find details on these installation methods in our nice!nano build guide: docs.typeractive.xyz/build-guides/corne-wireless/nice-nano (This guide applies to both Corne and Lily58 builds).
Let me know if you have more questions!
So without a nice!nano the keyboard won't be able to work correct
That's correct! The nice!nano is the "brain" of your wireless mechanical keyboard. It's the microcontroller that runs the ZMK firmware, processes your key presses, and handles all the wireless communication (Bluetooth Low Energy).
Without a nice!nano installed, the keyboard won't be able to function.
Any tips on pressing the switches onto the board?
Absolutely! Here are some tips for installing your switches:
1. Install into the plate first: It's easiest to put most, if not all, of your switches into the switch plate before inserting them into the PCB.
2. Check orientation:
* Choc switches: The pins on the back should be on the bottom.
* MX switches: The pins should be on the top.
3. Straight pins: Before inserting into the PCB, ensure all switch pins are perfectly straight to avoid bending them.
4. Gentle insertion: Slowly and carefully line up the switches with the PCB. Insert them softly all around the board.
5. Firm push: Once everything is lined up and slightly inserted, push down firmly on each switch to ensure they are fully seated in the hotswap sockets.
You can find more details in our build guide under the "Switches" section: docs.typeractive.xyz/build-guides/corne-wireless/switches (or the Lily58 equivalent).
Let me know if you run into any issues!
So with a nice!nano v2.0 and no-solder spring headers, will my board be able to run without batteries if I get a usbc to usbc connection?
Yes, your board will be able to run without batteries if it's connected via a USB-C to USB-C cable.
The nice!nano is powered directly by the USB connection when plugged in. The battery is primarily for powering the keyboard when it's operating wirelessly and not connected to a power source.
The no-solder spring headers facilitate the connection between the nice!nano and the PCB, but they don't affect the power source when plugged into USB.
I see a Silicone USB-C to USB-C Cable to use for connecting the board to the computer, do I need another wire to connect the boards to each other?
No, you won't need another wire to connect the two halves of your keyboard!
Our keyboards, like the Corne and Lily58, are designed to be fully wireless. The two halves communicate with each other wirelessly via Bluetooth, powered by the ZMK firmware.
The USB-C to USB-C cable is only for connecting one of your keyboard halves (typically the left one) to your computer for power, charging, or flashing firmware.
If I want to run it completely wired how could I do that
To run your keyboard wirelessly, you'll rely on the nice!nano and the ZMK firmware.
1. Install Batteries: Ensure you have the 110mAh 301230 batteries installed in both halves.
2. Power On: Turn the power switch on each half to the 'on' position (pushed up).
3. Firmware: Make sure you've flashed the appropriate ZMK firmware to both nice!nanos. You can find the default firmware files on our documentation: docs.typeractive.xyz/build-guides/corne-wireless/firmware (or Lily58).
4. Pairing: Your keyboard will then be ready to pair via Bluetooth to your computer or device. The left half connects to your device, and the right half connects wirelessly to the left half.
For detailed pairing instructions and troubleshooting, please refer to our guide on keyboard pairing: docs.typeractive.xyz/troubleshooting/keyboard-wont-pair.
Let me know if you have any more questions!
If I want to run it only wired how could I do that
To run your keyboard primarily wired, you would connect one half (typically the left) to your computer using a USB-C to USB-C cable.
Here's how:
1. Connect one half: Plug one of your keyboard halves (usually the left) into your computer using a USB-C to USB-C cable. This half will draw power directly from your computer.
2. Wireless communication between halves: Even when one half is wired, the two halves of your split keyboard still communicate wirelessly with each other via Bluetooth, powered by the ZMK firmware.
3. Batteries (optional for wired use): You don't strictly need batteries installed for wired-only operation, as the connected half will be powered by USB. If you do have batteries installed, you can turn the power switch on each half off to prevent them from draining when not in use or charging.
4. Firmware: Ensure you have the correct ZMK firmware flashed to both nice!nanos. The same firmware used for wireless operation will work for wired. You can find the firmware and flashing instructions here: docs.typeractive.xyz/build-guides/corne-wireless/firmware (or Lily58).
So, while one half connects wired to your computer, the split nature of the keyboard means the halves still communicate wirelessly.
To elaborate on the above, you’d just plug both in via USB, they’ll still communicate wirelessly to each other
oh that's cool, so I could have 2 cables running from my each half to my computer?
yeah. The right side would just be power
so you could plug it into anything that gives power
Oh okay, so I could set it up like this?
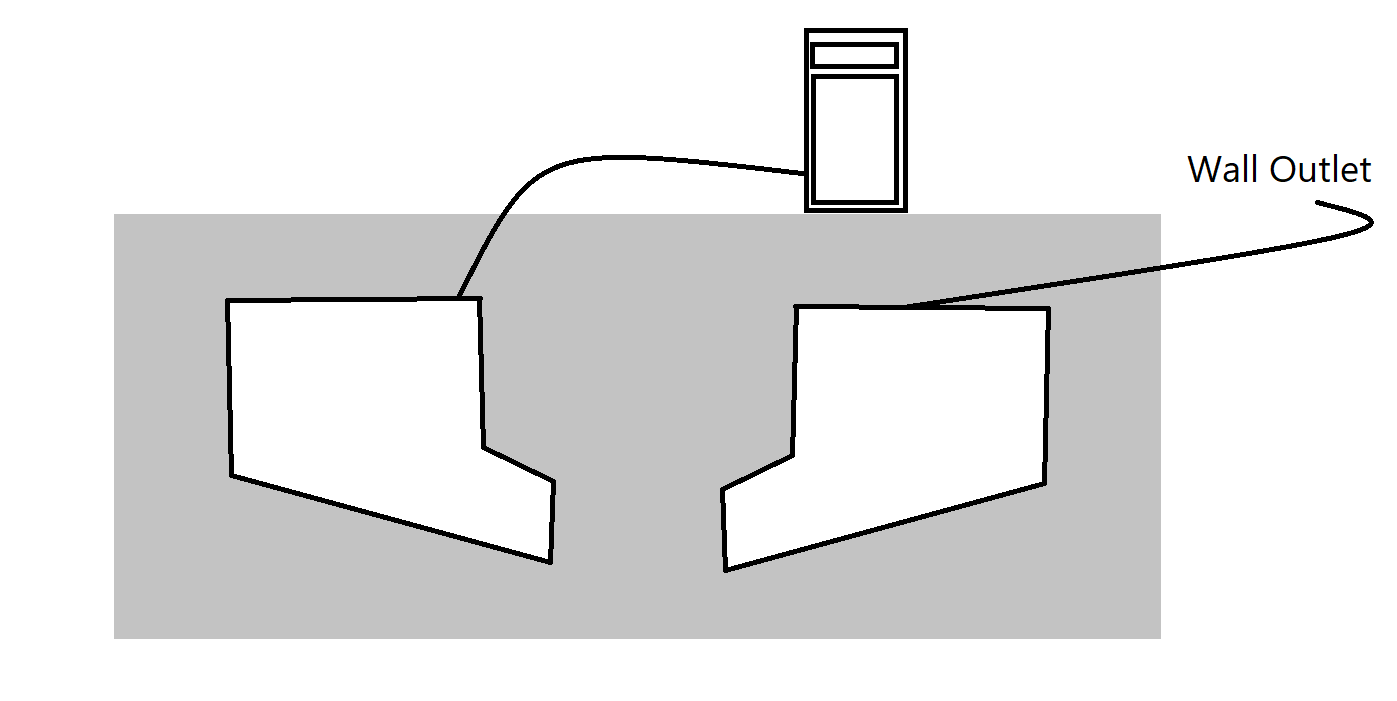
yep
Very cool, all without getting a wireless header?
not sure what you mean?
Oops I was confused
Thanks for jumping in!
What do the numbers on the back of the blank keycaps signify?