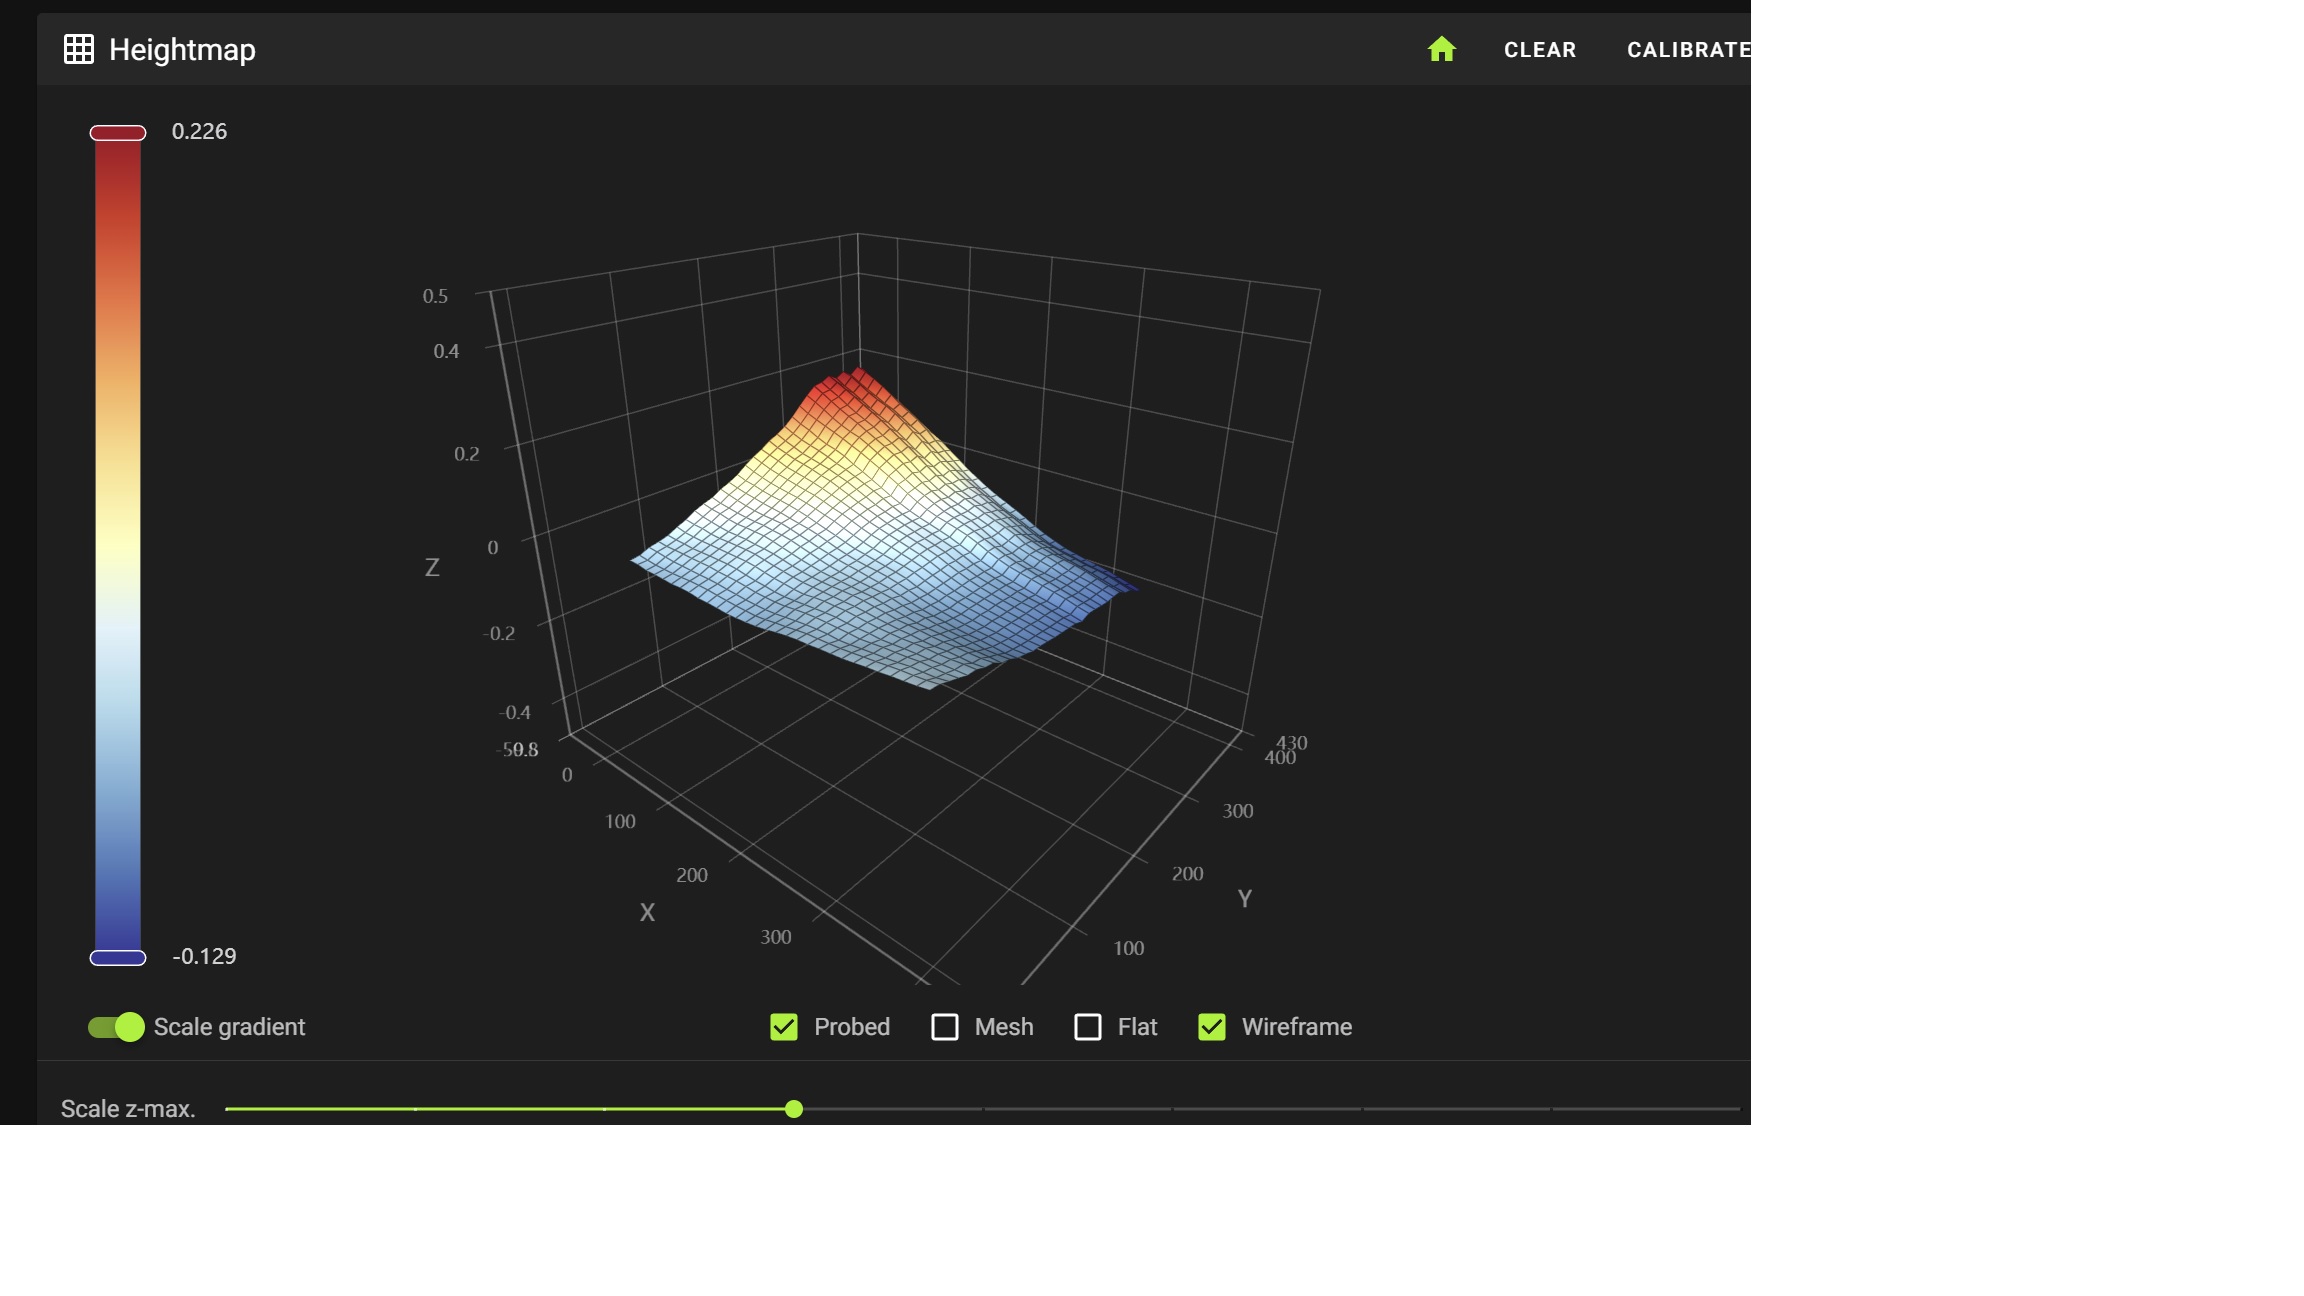
Vcore 4 Hybrid 400 Comissioning bed mesh

So, this is my first try after comissioning, the D corner seems to be a lot higher so I am guessing I need to fix this? I am reading the guide but I cannot wrap my head around how to adjust it, I don't understand what I need to loosen and hit slightly?
No description
10 Replies
rms497
rms497•2mo ago
I'll preface this with -- Im a complete beginner and I have only done this once. However, having just gone through this myself, I believe you need to loosen the quick connectors in the corners and the back, on the appropriate sides. In your case, (and I found this counter untuitive), the peak woulod need you to move the extrusion the y gantry is on, up. So if the coordinates of that peak are 500,500, you would need to loosen the quick connectors in that corner and get the extrusion to move up. I found that using a mallet did not work well, but irwin quick grips worked perfect (thanks @Martin Hanbury ). You can use them as leverage to get the extrusions to move up (or down) with relative ease and much greater precision. Hopefully that makes some sense, and then you would apply that to the other corner if necessary. (for reference, attaching a pic of quick grips: https://m.media-amazon.com/images/I/61jsbtdxmUL._AC_SX679_.jpg)
Martin Hanbury
Martin Hanbury•2mo ago
Just to expand on the technique @rms497 is describing using the quick clamps - I never found using a hammer to have enough precision when trying to make small adjustments. You're generally only needing to move the extrusions <0.5mm or so, so its quite small adjustments that can be difficult to gauge using brute force. So to get more precision, you can achieve measurable adjustments by using quick clamps to leverage the extrusions. The way I do it, is I set up a machinist square or something nice and flat like that, and clamp it in place on the Y rail at roughly 75mm from the rear vertical frame extrusion (the actual distance doesn't matter here, it just helps for it to be a known distance so that your measurements are always in the same spot). Then you can use vernier calipers to measure from the top frame extrusion to the top of the machinist square, and this becomes your reference height. So say for example its 89.25mm (again, the actual number will depend on the equipment you're using and its nominal, you're just using it as a reference for how far your adjustment has moved the gantry). Then to make the adjustment, you setup another fairly large quick clamp from underneath the motor mount to on top of the printer frame, and tighten it up just enough that its going to support the gantry when you release the frame connectors. Then you can release the connectors, and use your reference measurement point to make your adjustment with precision. So to use your above mesh as a specific example, your back left corner of the gantry (Point D) is ~0.25mm too LOW (closer to the bed), and it needs to move up towards the top of the printer. So you setup the clamp system as described above on your left Y rail, get your reference measurement of let's say 89.25mm, release the frame connectors, and now while using the verniers on that reference measurement point, gently squeeze the clamp to move the extrusion up, and you're looking for that reference measurement to get SMALLER as you're moving the gantry extrusion closer to the top frame of the printer. You know you need to move the gantry roughly 0.25mm, so you squeeze the clamp until your vernier is measuring 89.00mm, and then obviously before you release the clamp you retighten your frame connectors. Now you can release the clamp, remove your reference measurement setup and everything from the rails etc, and perform a Z_TILT_ADJUST and then calibrate a new bed mesh to see how your adjustment effected things. You will find that the actual change you achieve won't precisely line up with the adjustment you made, ie. It's not quite as easy as just bed mesh is 0.225mm out of flat so move gantry 0.225mm. But once you've made a couple of adjustments like that, you'll start to understand how much you need to move the gantry to achieve the bed mesh shape you're wanting. And the beauty of this system is because you're doing it with a precision measurement of a known position, its very easy to get things back to where they were if you find your adjustments are changing things for the worse. Using this method, its quite quick and easy to get even a 500mm gantry to under 0.2mm range.
danne77sthlm
danne77sthlmOP•2mo ago
I just realized, I made a terrible mistake, I have put all of my backside quick connectors the opposite way around, so all of my screws are on the inside, oh dear lord, why did I not realize this before :mildpanicintensifies: I just realized, I made a terrible mistake, I have put all of my backside quick connectors the opposite way around, so all of my screws are on the inside, oh dear lord, why did I not realize this before :mildpanicintensifies:
rms497
rms497•2mo ago
You can still do this, if you have the ability to access at least the back quick connectors you won't have to take it apart. I had done this on one of my extrusions and you can still access, though it's a pain int he ass and you have to loosed the belts a bit. Even if you reversed the back ones, they are (to my understanding) secondary to this process and you can make an attempt. The primary ones, even with quick connectors installed backwards (the ones on the extrusions the gantry is actually mounted to), can still be accessed. You may have to tear it down I'd suspect, but you can attempt without doing so.
danne77sthlm
danne77sthlmOP•2mo ago
I just wish this would have been made more clear in the manual, cause its so easy to miss this
rms497
rms497•2mo ago
Yeah, something to double and triple check becuase it can be devastating to find this out after getting all the way through the build. I imagine after doing it a couple times it gets easy, but I found it to be incredibly frustrating and difficult in places on this, my first time...
danne77sthlm
danne77sthlmOP•2mo ago
same here, I have now dismounted them and shifted them correctly, phu, this is a real bear in the heat
danne77sthlm
danne77sthlmOP•2mo ago
Hi again, I does not seem to get it any better than this, is this okay?
No description
rms497
rms497•2mo ago
way better than I have! 🙂 I was happy at .1mm
danne77sthlm
danne77sthlmOP•2mo ago
oh, okay, thats good, that makes me happy, then I can mark this as solved 🙂

Did you find this page helpful?