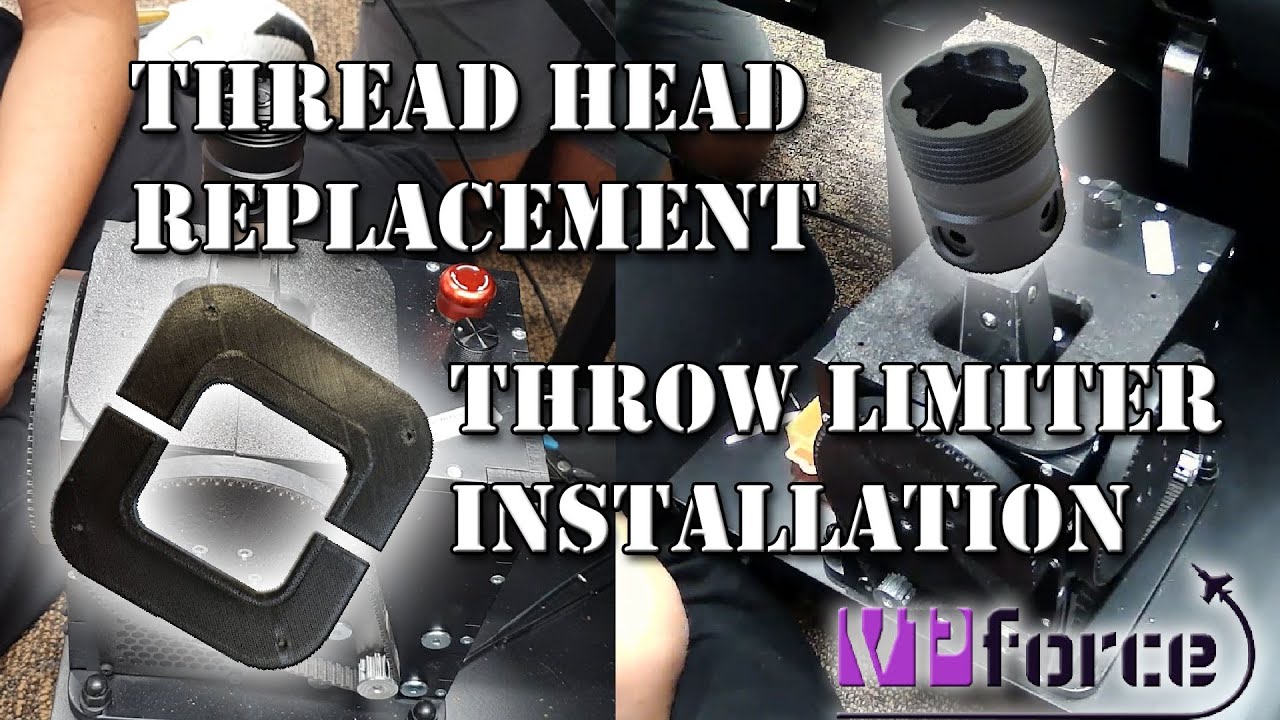
I ordered the Rhino's 8020 metal mount. The one side with the 2 bolts is snug to my 8020 but the other side has alot of slop or flex in it. The Rhino will bounce up and down when I stall a plane and it's kind of annoying. I tried placing some small rubber pieces between the metal but it still has slop in it. Should I just try to drill some holes and mount with more bolts? I can't really counter sink is though?
Related to metal mounts, any chance we can get a metal VKB adapter (gunfighter 4)? Would be great to have the peace of mind with metal. And then I could Frankenstein a VKB grip onto a RealSimulator base too…
very excited for my rhino to turn up over the last few days - could anyone point me in the direction of a good solution to mount it to a NLR flight seat pro? ive heavily considered just throwing some plywood underneath the seat and bolting the rhino to that but itd be a big pain in the ass so if theres someone that makes a mounting plate for the existing center mount on the seat or has another idea thatd be amazing
Could likely find a used ender 3 or something for $100. Sizeable area but lacks any automation so require learning what craft there is in printing but can definitely achieve great prints with the effort.
hi, a brand new bambulabs A1 mini is just 199,- bucks and far FAR superior to any Ender 3 kind of printer. Seriously don't save 50 bucks and get 20% of the performance.
Another vote for Bambulabs (owning a P1S with AMS as my third printer now): Their software is excellent, the handling is the easiest I have seen for years, the automated calibration and filament loading is really a gift, the precision of the prints out of the box is amazing. If you just want to print that's the way to go.
Another plus one for a Bambu Labs, just got a P1S myself, but I hear the A1 is good too.
And TheAmazingGreat, all I keep seeing is people complaining about Ender 3’s online, and basically now they’ve moved to a Bambu Labs printer they can finally start getting over the PTSD the Ender 3 gave them and now spend more time printing than tinkering and fixing stuff with the printer.
There is nothing per se wrong with an Ender 3. It is just not state of the art anymore. The manual bed leveling alone is a show-stopper today (before I got a Prusa MK4 for the office and later an A1 mini for private, I used an Ender 3 for a couple of years). If we were talking a big gap in money for a modern printer - of course an Ender is fine. You will get your stuff printed. Very slow, and not dimensionally perfect but still..... ....but as I said - a brand new A1 mini is just 50,- bucks over the budget given by @TeufelHunden . If that's a hard limit - well I would look for a used A1-mini. But honestly it would be wiser to find the 50,- bucks somewhere.
Of course an A1 mini comes with one shortcoming - It has only 180 bx 180 build plate. But I can count on one hand the times I needed more than that in the past couple years.
The reason people advocate for bambu over ender is that its a lot less hassle. Sure, you can print decent things with a 150 dollar printer, but those will take time to set up and dial in. A bambulab(there are others but its just the best) is well tuned out of the box and you can instead focus on printing.
It'd make the comparison between a beaten up older car and a new cheap one. Sure, you might be able to get the first car for cheaper, but itll require a lot more maintenance than if you save up for a brand new one.
So, to answer the question, yes, an ender 3 would likely be possible for that price, and itll print what you want it to. Just know that itll take time to set up and dimensional accuracy and speed will be worse than the bambu a1 mini
Sure. The point is you can get something really good for 200,-. Recommending something far inferior for 150,- would simply be bad advice. Sometimes the best advise is: Don't do it, save some more. You can have a different opinion, thats fine, But is seems a broad consensus.
Far inferior is subjective, that’s my point and I’m sticking to it. I defend Ender 3 because I’ve spent the time to dial it in and it works great. Bambu user defend their printers because they spent the money and it works great.
I have no horse in the race, as I don't 3d print. But as a neutral 3rd party you seem to be the only one defending something because it's what you purchased. The others are giving valid advice. Saving up another $50 seems 100% the right call. Although at the budget amount, $50 is a large percentile increase, it should be doable for any that can afford to buy or build a rhino.
Everyone is defending based on what they purchased. In my opinion negative points brought up about Ender 3 are invalid but that’s because I have experience that says otherwise.
Coming from years with an Ender, I am not looking to bash it. But especially if you are new to 3D printing, just so much time goes into learning how to set up things right. And when you want to go to PETG, even with experience you end up with misprints regularly, you spend time troubleshooting. And in the end you will spend money on upgrades. Just the money I spent to make it more quiet. $150 is a tiny budget to spend on a printer, so you have to make concessions somewhere. I think spending a bit more on a Bambu will save loads of time and frustration.
This talk is all about hardware, but how does one learn what is needed to use the hardware. For instance, if I want to find and use files for belt covers for the Rhino's exposed belts, what is the workflow?
Basically a bunch of reading, watching youtube videos and doing a lot of trail and error... Simplified workflow: 1. Setup printer for the desired filament type (normally there are instructions doing some test prints to decide what parameters to use for temperature, flow rate...). This has to be done once and can be used for further printing 2. Get a description file for the object to be printed. This is normally an STL file. You can create such a file by using CAD software by yourself (FreeCAD, Fusion 360,...) or somebody else already provides this file. 3. You need to define printing parameters for the object like how strong are bottom, top and walls, percentage of infill,... to define how strong the object will be. If somebody alread provided the STL files there are normally recommendations which settings to use. 4. Translation of the STL file to printer specific GCode. This can be done by a program called Slicer. There are several available, normally there is one favourite for each printer brand to be used (Bambu/Orca Slicer, Ultimaker Cura...). In the Slicer you import the STL file, place it on the (virtual) printer plate (orientation can be important), set the parameters defined in step 3 and slice the project. The resulting GCode can be sent to the printer (newer ones using WLAN, older ones USB stick or memory card). 5. Start printing, then wait and hope everything is running smooth...
I think I can agree to that. Bambu Lab printers were originally in almost the same price range as Prusa, but this summer they celebrated some anniversary and did a massive price reduction (maybe there are also some new models in the pipeline). There is an intersting video of a printer farm owner comparing Prusa and Bambu: https://www.youtube.com/watch?v=x_Esrxt7GII
As I said, I‘m a former Ender 3 user as well. And I agree that you can achieve good results with it, but it ain‘t easy. And you can’t tune away the slowness. The tech has simply advanced and the ender isn’t up to date anymore.
I think as someone has summarized it: your choice of 3d printer depends on whether you're interested in 3d printing or 3d printering- tinkering with 3d printers, getting them set up just so, etc. Something like an Ender 3 can definitely be tuned to create great prints, but it may require a fair bit of fine tuning, possibly making some modifications to it, etc. If you're happy to spend time and effort learning and doing all those things, that's a perfectly fine choice.
I'll just add that you should make sure you get one big enough to print what you want to build. The Proto DIY Rhino for example, needs at least 190mm I believe. Check the parts and specs yourself first.
I just so happen to be printing those tonight on my P1S as my Rhino is coming next week, and I’m not a expert as I’ve only just got it, but as these are just covers and don’t need to be very strong there’s not a lot to think about for them at least.
So, double click the .stl file, it opens in the slicer program, which I’m just using Bambu Labs own Bambu Studio, I right click the model and change which filament I want to use if it’s not the default as I have four filaments that can be automatically loaded into the printer.
Again, doesn’t need to be strong so I’ve just left most of the settings default including the amount of infill to 15%. The only thing I did was lower the speeds of the different parts that make up the build as it really doesn’t add much time, about 20 minutes in this case.
Then as these have a few overhangs I’ve switched on the supports function and made sure the filament used for the supports is the same as I’m using for the model as I have plenty of the black PLA+ filament, and as I’ve still got some of the Support PLA filament the printer comes with for the bit of the supports that actually touches the model that breaks away a bit more cleanly when the print is finished I make sure that is selected for that part.
Then I press on the Preview tab, make sure it creates the G-code without errors or any issues, and then press on Print Plate and off it goes, and so far all has been good, I’ve printed over 20 items in the last 9 days including the main pulley for the Virpil rudder pedals FFB mod earlier today by Number481, I sent it to print, went to work (yes there was someone in the house just in case) and it had finished the same time I finished work, no hassle.
All in all there’s a bit to learn, but the reason I went with a Bambu Labs printer is there’s supposed to be less fussing around getting prints to work well, and that’s what I’ve seen many people say including a lot of people coming from Ender 3’s and though I’m only going by what they have said as I have not used that printer myself, I feel I understand what they mean already.
Let’s make one thing clear though, mainstream home 3D printing is still in its infancy, and even years from now 3D printing will still involve some level of tinkering and maintenance.